Photographing products is entirely different from photographing recipes. When a product becomes your main hero, it's crucial to highlight it and make it stand out in the image. The focus shifts, and the final meal is no longer the hero of the scene; the product takes all the attention. Everything else on the scene has a supportive role.
If you find product photography challenging and want to elevate your images, here I share the essential composition tips for products that can transform your food photos and portfolio, helping you attract your dream clients.

Let's dive into 9 Composition tips for product photography
Tip n.1: Position the product around the centre area of the image
When you want to create a product image, the product gains the main position, and other elements have a supporting role.
The positioning of all the elements becomes crucial, and the product should be placed at the intersections of the composition lines. It doesn't matter what type of composition you use; it can be the rule of thirds, golden triangle, or dynamic symmetry. The intersections of the composition lines are the best placement for the product - this is where all the attention is. Other elements have a secondary placement, around the edges of the scene.

Diagonal method composition - the product is placed on the intersections of the lines
Tip n.2: Add the negative space around the main product
Do not be afraid to leave some parts of the frame empty. Negative space can help draw attention to the food. And having a negative space around the main product helps to elevate its importance, and it naturally makes the product stand out.
Negative space, on the other hand, also creates space for the text, which your clients might need for marketing purposes. It's also common to work with negative space on the top part of the image above the product; or, in case you create a horizontal image, the negative space can be created on one side of the scene. This is also helpful, especially for your clients' websites.
Tip n.3: Visual balance
The Visual balance technique helps you place the elements on each side of the scene so that the image feels balanced. Some elements might feel visually heavier than the others. You need to observe this and balance the visual weight on the left and right sides of the scene and the bottom and top of the frame.
This can be more challenging when working with a small product that is accompanied by a larger supporting element. An example is below. The pasta plate feels visually heavier, which adds visual weight to the right side of the image. To balance this, you can place a fork next to the product, which visually balances the weight on both sides.

Visual balance - product and fork on one side balances visually the weight of the white plate

Craft your dream photography style that resonates with your dream clients
Join my free training, where I help you define your dream style, analyze your skills, define your dream clients and create an action plan to achieve your goals.
PS: this training is for free with tons of value!
Tip n.4: Less is more
When creating images of recipes, we often tend to include more elements to tell a story. It's natural for us to work with more and add a variety of elements that together tell a larger story. This is, however, different when photographing products, and less is more in this case. Work with fewer elements and only the ones that complete the essential story of the product.
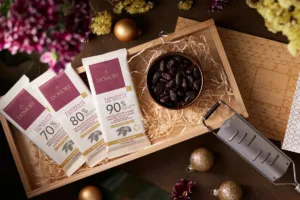
For example, suppose you photograph chocolate and include a bowl of fruit next to it. In that case, it makes perfect sense for the story, as taking a healthy and energetic snack in the afternoon = fruits and chocolate work perfectly together. However, if you create a product image and the fruits are not the ingredients of the chocolate itself, it's essential, therefore, to think about the supporting elements so you do not to mislead the viewers.

Supporting elements that are present in this image, are the ingredients of the chocolate product
Tip n.5: Leading lines
When using supporting elements, position them so that they point towards the main hero—the product. This helps create visual lines that lead toward the main hero and support its importance. It's easy to do this with forks, spoons, and knives, but you can also use other elements that point towards the product.

Leading lines can be created by plants and leaves, or shadows too
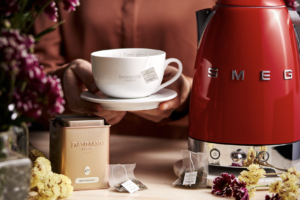
Tip n.6: Make sure the label is perfectly readable & logo visible
It's important to place the product so that the label is readable and the logo is perfectly visible. Sometimes, the light can make the logo not well seen, or often, when using some angles, we cannot read the label or understand what kind of product it is. This is, however, very important for product images, and you need to make sure that the angle or lighting is perfect for highlighting the label and logo, too.

Product Photography Masterclass
Learn, how to create the product images = masterclass showing you how to create this scene - from the beginning till the end, covering the lighting; depth of field; composition or editing and creating a composite
Included in the Members' Club - click here and learn more about my membership
Tip n.7: Create the correct depth in an image
When photographing products, we often need to increase the depth of field to capture more of the product in focus. The depth of field can be increased by a higher f-stop number and/or by creating a larger distance between the camera and the scene.
In my last client shoot, I used a 100 mm lens and worked with f-stop 13 to create the depth, which allowed me to make the product in focus, while the pasta was slightly blurred but still recognizable. I didn't make the pasta in focus, as it was unnecessary. However, the important part was to make the sauce on the pasta quite recognizable and not too blurry.
The final composite image, that was created by two individual images (shown below)

The first image where the product is captured

The second image, where the product is opened and placed on a plate
Tip n.8: Create Composites
When creating product images, it's important we photograph the closed package but also show how the product looks likewhen it's opened. To do this, you need to open the product - to show the texture and color and position it in the scene. When working with clients, you ask for at least 2 products, so one can remain closed and the second can be opened on the scene. But, if you work on your personal projects, you don't need to buy 2 products. You can create a final image with a composite. If you don't know what a composite is and how you can create it, I have created a complete Photoshop course inside my membership.
Tip n.9: Make sure the lines are straight
Last but not least, it's important to make sure that any horizontal or vertical lines in the images are perfectly straight. This applies to backdrop lines, products, or other elements, such as tall glasses or bottles. Often, due to the lens's distortion, the lines become tilted. Sometimes, it's necessary to correct them on the scene, and sometimes, it's enough to use a crop tool and level the image in the editing software.

Let's sum up these 9 composition tips for product photography
- Position the product at the intersections of composition lines
- Work with the negative space
- Create visually balanced images
- Less is more and don't use too many unnecessary elements
- Use leading lines
- Make sure that logo and label are well-visible
- Create the correct depth in the image
- Create a composite when missing the second product
- Make sure the lines are straight
Craft your dream photography style that resonates with your dream clients
Join my free training, where I help you define your dream style, analyze your skills, define your dream clients and create an action plan to achieve your goals.
PS: this training is for free with tons of value!
Other blogposts to learn about product photography:
If you are member of my Members' Club; click here to access the membership, where you find more resources and courses to help you grow your product photography
And, if you are not our member yet, learn more about our Members' Club and how it can help you become a professional food photographer, working with brands and creating a food photography business you dream about.
Hi there! I'm Lucia Award Winning Food Photographer, Teacher, Business Coach, and, Founder of FOODlight. I am passionate about food photography, online business, sharing my knowledge & building a community of amazing like-minded creatives, such as yourself, that inspire and support each other. Feel free to reach out to me via my email lucia@foodlight.io or via Instagram, I'll be happy to connect with you!


Thank you for this-Very clear and concise information and am considering diversifying my income in product photography…I’m currently working for bloggers and things have slowed a bit.
Hi Kelly, Thank you for your comment! I am happy to hear the blogpost was helpful 🙂 Yes, diversifying your business into product photography can bring a more stable income. Moreover, working with brands can lead to higher-paying projects too.