One of the biggest challenge that you have to make is to choose the right images for your portfolio. I often see portfolios that don't have enough product shots or that include the wrong types of images. This happens because when you're just starting out in food photography, you might not have a lot of work from clients to fill your portfolio with different kinds of product photos.
And, It can also be difficult to choose the right images that will grab the attention of your dream clients and convince them to pick you for their photography projects. That's why, in this blog post, I'm going to go deep into how to choose the best product images for your portfolio, so you can make a portfolio that really draws in the clients you want.
In a recent live coaching call in my Members' Club, we looked at the image gallery of Alice @epictureanshots, our member. We talked a lot about which images she should use for her portfolio. The call was super helpful for everyone, and I think the advice will help you too in making an amazing portfolio gallery.
Step 1 - identify your ideal client
The first thing you need to do before you start putting together your portfolio is figure out who you want to work with and what kinds of food products you want to photograph.
If you dream of working with bakeries, local coffee shops, or fresh fruit and vegetable sellers, your portfolio should have pictures of bread, bakery items, breakfast scenes, coffee shops, coffee at home, coffee to-go, and fruits and veggies in different settings. If you want to work with brands that sell products like olives, olive oils, crackers, wines, cocktails, etc., don't fill your portfolio with pictures of cakes, sweets, or breakfast. You need to have specific product images that speak to your dream clients.
So, before you even start to put your portfolio together, know who your dream clients are and focus on making images that will attract them. If you need more help with this, our Members' Club has lots of personal support and resources. Once you enter, you can use the CLIENT IDEAS GENERATOR TOOL to come up with endless ideas for your dream clients. You will find this tool in our Resource Library.

Step 2 - Create those product images
Your portfolio represents your skills and it should attract your ideal clients. If you want to get some client work quicker, it's a good idea to include product images. These are pictures where the product is the star of the shot. These kinds of photos might not seem easy to make at first, especially if you're just starting out and are used to taking pictures of finished dishes. But if you practice taking product shots, you'll learn about the challenges and how to overcome them. This means you'll be more relaxed and ready when your first client comes knocking.
Practicing product photography before you get your first client can help you feel less stressed and make the shoot go smoother. How to make great product shots is something I'll cover in another blog post. Or, you can join our Members' Club and watch our masterclasses that will show you how to set up and photograph products.

Grab my freebies and improve your skills
Join my VIP e-Library and get access to all my freebies and live training replays to help grow your food photography skills.
Step 3 - choosing the right images for your portfolio
Now that we've covered the first two crucial steps, let's dive into how to actually pick the right images for your portfolio gallery. Your portfolio should feature about 20-50 images, varying with your experience level. It's also a good idea to organize your gallery into specific categories if your target clients have different needs. This helps guide each client to a dedicated gallery. Including both horizontal and vertical images in your gallery is important too.
Let's discuss a couple of photos to understand which one to pick for your portfolio and why.
Image A

Image B

Images author: Alice @epictureanshots
Both images are beautiful; I appreciate the simplicity and how the product is integrated into the scene. However, when choosing one for the portfolio, image B stands out.
Image B integrates the product seamlessly into the scene without cropping out any text, making it easy to read and understand what the product is about. This contrasts with Image A, where the product is upside down, making the text hard to read.
Image A

Image B

Images author: Alice @epictureanshots
Both images are visually appealing, but for my portfolio, Image A is my choice. The product is centered, drawing proper attention without any distractions. The beautiful bokeh and editing, along with the balanced choice of colors and elements, make the product perfectly sized within the scene. That means, the product occupies the right space, it's not too small or too big. And, the most important thing: the product is perfectly in focus.
For the second image to be a strong portfolio image, I would suggest to center the product more and avoid blurring it excessively. It's crucial for the product to be in focus or easily readable. When working with clients, they often request the product to be the focal point, alongside or instead of the meal. To be able to make your meal in focus, as well as the product, you might need to create a composite. This means: capturing two photos and putting them together into one in Photoshop. Creating composites is also what I teach in our Product Masterclass in the Members' Club.
Image A

Image B

Images author: Alice @epictureanshots
This is a great example of product images for the portfolio, and let's consider two scenarios.
Scenario A: Your dream clients are brands like La Cuvée, producing champagnes, wines, and other beverages. Here, Photo A is the right choice for your portfolio. The product is well-centered, the minimalistic supporting elements tell a story, and the product label is in focus.
Why not the second image?
While Image B is beautiful, the focus is on the cake, while the bottle is blurred and off-center. This shifts the attention away from the product, making the cake more interesting.
If the cake and the champagne were from the same company or parent company, including it in the portfolio would be appropriate. However, in product photography, it's uncommon to mix brands in one image unless they're collaborating on a special project.
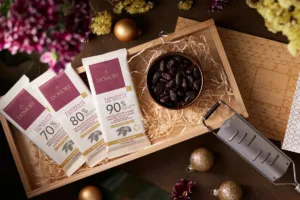
And, this photo below is the example:

This is an image that I created for my client. The client has a wide range of products, such as chocolate, cookies, cakes or tea. They asked me to create an image, including their and a product of another company in the scene. This was because, this was shot for a special project that involved those two companies working together.
Grab my freebies and improve your skills
Join my VIP e-Library and get access to all my freebies and live training replays to help grow your food photography skills.
Conclusion
Let's just recap the most important points I covered in this blogpost:
- Know Your Dream Clients: Figure out who you want to work with and what kind of products they sell. Understand what images they use and make your portfolio appeal to these clients.
- Take the Right Shots: Focus on getting good product photos where the product is the star.
- Choose Wisely: Your portfolio should have 20 to 50 great photos. If you're targeting different kinds of clients, organize your photos into categories.
- Variety is Key: Include both horizontal and vertical photos to make your portfolio interesting and versatile.
- Picking Photos: When choosing which photos to include, go for ones where the product fits nicely into the scene, label is easy to read or the product is in focus.
- Think Like Your Client: Pick photos that will catch the eye of your dream clients. Don't mix different brands in one photo unless it's for a special project.
Remember, your portfolio is the key - it's your most important asset when building and growing your business. It shows off your skills and should attract the clients you want to work with. Keep these tips in mind to build a portfolio that really shows off your best as a food photographer.
Are you looking for help & support in your food photography journey?
The Members’ Club is a place where creatives, such as yourself, find community & resources to help them grow their skills to another level and start the business of their dreams. We have a fantastic community that supports you all the way through building outstanding food photography skills. Inside our Members’ Club, you will find many resources, live coaching calls, courses and masterclasses, image critiques, and a forum where you can ask questions and get additional support.
Hi there! I'm Lucia Award Winning Food Photographer, Teacher, Business Coach, and, Founder of FOODlight. I am passionate about food photography, online business, sharing my knowledge & building a community of amazing like-minded creatives, such as yourself, that inspire and support each other. Feel free to reach out to me via my email lucia@foodlight.io or via Instagram, I'll be happy to connect with you!