Today, I will show you 6 ways how to style flowers in food photography images, and, I will also cover styling with plants or herbs :). Try adding flowers or plants to your scene if your images miss something. They brighten up the mood, help you add more depth, and make an image more natural and home-feeling. Flowers and plants are excellent props for food photography images, and if you are unsure how to use them, let me show you a few examples of my client work and personal projects.


1. When you want to add a more natural feel to your scene, styling flowers in food photos or even with plants are the first choices
Many of my clients ask me to add a natural feel to the images I create for them. We often use words like ‘natural or green plants’ when describing the project. Adding flowers or plants always work when you want to create a home & cozy feel that creates a deeper connection with the audience. So, whenever you have a client that would love to connect with their audience more, suggest adding plants or a vase with flowers to the scene.


Extra tip: when you add flowers or plants to your images, make sure they don’t take too much attention away from your hero. Always ensure that the product is the main hero in the image unless you shoot flowers, plants, and bouquets for a flower shop. 🙂
2. Using plants to re-create an outdoor feel in your images
I don't have a garden, so when a client asks me to create an outdoor feel, I must do this in my studio. I have many plants at home (I love plants), so re-creating an outdoor feel is not an issue for me. If you are not a plant person, (I have some friends that just prefer having no plants in their home); consider buying fresh branches of eucalyptus for example, and let it dry, or investing in great-looking fake plants & flowers.
The plant that I use most of the time is the Parlor Palm. I got it a few years back, and it helped me during many photoshoots. It adds an exotic feel and works well when shooting cocktails.

It hasn't only been super helpful as it is included inside the scene, but this plant is perfect for creating beautiful shadows in all sorts of food photography images.


Another plant I strongly recommend (I love shooting with it) is eucalyptus. You can get it fresh and let it dry. It can last up to 1 year, but when it starts looking greyer, it is time to get a new one. 
Finding a fresh eucalyptus (at least in Turin) can be difficult, so try calling a few flower shops or visiting street markets; they might have florists stands there. It’s not that expensive, and you can get a beautiful bouquet of eucalyptus for a great price.

PS: check tip n.4 further below in this blog post to learn why I love using eucalyptus on the scene.
Grab my freebies and improve your skills Join my VIP e-Library and get access to all my freebies and live training replays to help grow your food photography skills.
3. Styling flowers in food photos, in a way to add more depth to your images.
It's essential that you create depth in your food photography scenes; this is what gives them the 3-dimensional effect. Otherwise, the photos would feel flat. How can you style flowers in food photos to help you create more depth? Position them in the foreground & in the background, and by working with a shallow depth of field, you can make them blurry. Such photo feels magical and it will help you achieve the desired depth in your images. We talk about the depth of field inside our Members’ Club, you can join us and learn so much more.
I love using this depth effect in many of my images, and my clients often request such an effect too! You can achieve it at home or in your studio very easily too. If you have stands with clips (check this blog post about my equipment), you can set your scene, and the clip would hold your plant while shooting. You position it in front of your lens so that it covers just the edge of your photo.
If you don’t have extra stands and clips, you can definitely do it without them. In that case, making a composite will save your day. 🙂 You shoot more images while holding plants or flowers in your hand, capturing more images where you try various positions, and then choose the best ones and compose them into one final image. If you have never done a composite, we cover how to make them in our Retouching course inside the Members’ Club.

If you capture a flat lay, consider adding a flower to a corner of the photo. You can also position it on something to lift it a bit. Adding various heights to the scene adds to create more depth. I already wrote a few tips about this topic in this blog post.
4. Using flowers in negative space
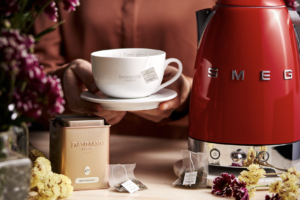
Another technique I love is to position flowers to fill in negative space. We just did this the other day with a client of mine. We aimed to create simple images with the product in use, but we were just missing something in the images. Luckily, I had dried eucalyptus in my studio, which saved our day. 🙂
And here is why I love using eucalyptus in my photos. The color of the leaves is a beautiful desaturated green/blue, it doesn’t take much attention. This plant is just perfect to include in the negative space, where you just feel something is missing, but at the same time, you don’t want to fill in that space with too many props.
Placing plants and flowers in the negative space will give a natural feeling; they are not much visible and add an extra cozy feel to the photos.


This was the scene I built during our Meet Up and recorded for our Members’ Club. I style flowers in this food photography image and describe every single step to build this scene. You can become our member and watch it and many other masterclasses, where I show you and explain how to create a scene from zero.
5. Plants or flowers are just the perfect gobo you need in your food photography scenes
A gobo effect is another reason to use flowers and plants more often in your food photography sets. 🙂
(Gobo - a tool that helps you create patterns of interesting shadows in the images. You position it between the light source and your scene. You can buy it or even do it yourself from a piece of paper.
You don’t need to necessarily include a plant in the scene; just position it between your light & your scene. This works best with hard light, try it, and you will see what effect this will have!

This is the image I create inside our Masterclass of the Members' Club, where I show you how to work with a flash to replicate natural sun light, and how to compose this scene.
Consider positioning your light source to the front when creating beautiful shadows in the backgrounds. This way, the shadows arrive in the background and will be more visible.
Or, you can use a backlight or a top light (in flat lays) and create shadows this way. You can even create beautiful gifs while moving leaves, as seen in this GIF below. If you want to learn how to create GIFs and stop-motion videos, we cover this in our Retouching course in the Members’ Club.
6. Herbs can be the first thing to start with in food photography images
Herbs are the simplest way to add that natural feel to your food photography images. When not having plants, just place the herb pot on something, move it higher, and blur it out. It will help you add that depth to the image, as seen in the photo below.
But herbs are also an excellent way to add nature to a dish, representing a special recipe or dish: think of basil on top of some dish or a fresh mint in some cocktails. Nature can be shown in many ways in your food photography pictures.
When capturing flat lays, you can use herbs and position them to the corner. By working with a shallow depth of field, you can blur them out and create a beautiful depth in your photos. This is what I did in this photo here, I used a thyme and positioned it in the upper corner.

Are you ready to experiment and style flowers in food photography images? And, don't forget about plants or herbs!
If you do so and this blog post inspires you, remember to tag me @foodlight.io in your images, I'll be very happy to see your work. You can also use this hashtag: #foodlightsyourway and join other food photographers there.
I invite you to look at my Instagram, where I share some extra tips about using flowers and plants in food photography images. And to follow my weekly tips, events, and many more helpful resources. And if you have any questions, don’t hesitate to write me! You can do so at my email: lucia@foodlight.io.
Are you looking for more help & support in your food photography journey?
The Members’ Club is a place where creatives, such as yourself, find resources to help them grow their skills to another level and start the business of their dreams. We have a fantastic community that supports you all the way through building outstanding food photography skills. Inside our Members’ Club, you will find many resources, from courses to masterclasses, image critiques, live calls, and a forum where you can ask questions and get additional support.
Hi there! I'm Lucia Award Winning Food Photographer, Teacher, Business Coach, and, Founder of FOODlight. I am passionate about food photography, online business, sharing my knowledge & building a community of amazing like-minded creatives, such as yourself, that inspire and support each other. Feel free to reach out to me via my email lucia@foodlight.io or via Instagram, I'll be happy to connect with you!